This springtime stunner is gorgeous to behold—and very enjoyable to eat. Thinly sliced strawberries are laid in a concentric pattern atop a large round of pastry dough. Although the galette needs no embellishment, basil-infused cream lends a sophisticated touch to each slice.
SERVES 6 TO 8
Ingredients:
• ¾ cup heavy cream
• ⅓ cup loosely packed fresh basil leaves, patted dry and chopped
• ¼ cup plus 3 tablespoons sugar
• ¾ cup mascarpone cheese
• All-purpose flour, for dusting
• Pâte Brisée (do not divide into 2 disks)
• 1 pound strawberries, hulled (about 3 cups)
• 2 teaspoons cornstarch
• 1 tablespoon cold unsalted butter, cut into small pieces
• 1 large egg yolk, for egg wash
• 1 tablespoon water, for egg wash
Preparation:
1. Combine cream, basil, and 2 tablespoons sugar in a heatproof bowl. Set bowl over (not in) a pan of simmering water, and stir until sugar dissolves, about 4 minutes. Cover with plastic wrap, and refrigerate at least 1 hour (or up to 2 hours, for more pronounced basil flavor). Strain through a fine sieve into a bowl. Add mascarpone, and whisk until medium peaks form. Cover, and refrigerate until ready to serve, up to 2 hours.
2. On a lightly floured surface, roll out dough ¼ inch thick. Cut out a 10-inch round, and transfer to a parchment-lined rimmed baking sheet. Refrigerate or freeze until firm, about 30 minutes.
3. Preheat oven to 350°F. Meanwhile, cut strawberries lengthwise into ¼-inch-thick slices. Reserve end pieces for another use. Gentlytoss slices with ¼ cup sugar and the cornstarch, and immediately arrange in concentric circles on dough. Start 1 inch from edge, overlapping slices slightly. Fold edge of dough over berries. Refrigerate 15 minutes. Dot berries with butter.
4. Whisk together egg yolk and the water. Brush dough edge with egg wash, and sprinkle with remaining 1 tablespoon sugar. Bake until crust is golden brown, 40 to 45 minutes. Transfer to a wire rack to cool slightly. Serve galette warm with basil cream.
This Free Form recipe was published in 'Martha Stewart's New Pies and Tarts: 150 Recipes for Old-Fashioned and Modern Favorites by Martha Stewart Living Magazine'.
7/16/2012
Pear and Sour Cherry Flat Pie
No comments:
Posted by
Unknown
Labels:
Butter,
Cherries,
Eggs,
Lemon Juice,
Pie Recipes,
Puff Pastry
A mixture of sweet Bartlett pears and sour cherries fills sheets of flaky puff pastry. Traces of ground black pepper and five-spice powder (a blend of cinnamon, nutmeg, allspice, star anise, and Szechuan pepper used in Chinese cooking) provide exotic notes.
SERVES 8 TO 10
Ingredients:
• All-purpose flour, for dusting
• 1 box store-bought puff pastry, preferably all butter, thawed, or ¼ recipe Puff Pastry
• 2 medium ripe, firm Bartlett pears (about 1 pound 2 ounces), peeled, halved, cored, and cut into ¼-inch slices
• ½ cup (about 2 ounces) dried sour cherries
• ⅓ cup sugar, plus more for sprinkling
• 1 tablespoon plus 1 teaspoon cornstarch
• 1 tablespoon fresh lemon juice
• ⅛ teaspoon salt
• ⅛ teaspoon freshly ground pepper
• ⅛ teaspoon five-spice powder
• 1 large egg, lightly beaten, for egg wash
Preparation:
1. On a lightly floured surface, roll out and trim dough into two 10- by-7½-inch rectangles. Refrigerate or freeze until firm, about 30 minutes.
2. In a bowl, toss to combine pears, cherries, sugar, cornstarch, lemon juice, salt, pepper, and five-spice powder.
3. Transfer 1 rectangle of dough to a parchment-lined rimmed baking sheet. Spoon fruit mixture evenly onto dough, leaving a 1- inch border. Brush border with beaten egg. Lay remaining rectangle of dough over filling; press gently to seal edges. Refrigerate or freeze until firm, about 30 minutes. Meanwhile, preheat oven to 375°F.
4. Trim edges, and brush top with beaten egg. Cut five 5-inch vents in top. Sprinkle top generously with sugar. Bake until crust is golden and juices are bubbling, about 35 minutes. Transfer pie to a wire rack; let cool at least 20 minutes before serving.
This Free Form recipe was published in 'Martha Stewart's New Pies and Tarts: 150 Recipes for Old-Fashioned and Modern Favorites by Martha Stewart Living Magazine'.
Beans and Bean Products Chinese Ingredients
Beans and bean products play a prominent role in Chinese cooking, where they are used in much the same way as dairy products are in the West. The soybean, one of the most ancient staples grown in China, is richer in protein than an equivalent weight of any other food. However, because soybeans are hard to digest as beans, they are usually processed into sauces or, more important, into bean curd. Many imitation meat dishes, the backbone of Buddhist vegetarian food, are based on the numerous forms of bean curd. Fermented bean products are very important seasonings in savory cooking, while the red azuki bean, whole or in paste form, is used in many sweet dishes.
Bean Curd, Fresh
Bean curd, fresh Made from a mixture of finely ground soybeans and water, bean curd is used extensively in Chinese cookery.
Bean curd, puffed
Deep-fried pieces of fresh bean curd, used to absorb tastes and juices.
Bean curd sheet
Bean curd sheet Thin, dried sheet of bean curd; has to be moistened before use.
Black beans, fermented
Black beans, fermented Whole soybeans preserved in salt and ginger.
Red beans
Red beans Highly proteinaceous azuki beans, most commonly used for puddings in Chinese cookery.
Red bean paste
Red bean paste Thick paste made from puréed, sweetened red beans, frequently used as a sweet filling.
Bean curd “cheese,” red fermented
Bean curd “cheese,” red fermented Fresh bean curd, fermented with salt, and rice wine.
Bean curd “cheese,” white fermented
Bean curd “cheese,” white fermented Fresh bean curd, fermented with or without chili.
Crushed yellow bean sauce
Crushed yellow bean sauce Purée of fermented yellow soybeans, wheat flour, salt and water.
Szechwan chili paste
Szechwan chili paste Spicy hot paste of dried chili and crushed yellow bean sauce.
Soybean paste
Soybean paste Paste of crushed soybeans combined with chili, sugar and salt.
Yellow beans in salted sauce
Yellow beans in salted sauce Whole yellow soy beans fermented with salt, wheat flour and sugar.
This Ingredient Information was published in 'Yan-kit’s Chinese Cookbook by "Yan-Kit So (Foreword by Claudia Roden)" - p24 to p25'
7/14/2012
Black Beans (Feijão Preto Simples)
Brazilians love beans. These tiny legumes show up in some form in almost every meal. Brazil grows red, brown, and white beans, but the black bean is by far the most popular. What is it about a perfectly prepared pot of beans with its enticing aroma and comforting fl avor that makes them so popular? Why not try making some and find out for yourself?
Serves 4 to 6
Ingredients:
• 1 pound black, kidney, or white dried beans
• 8 cups water
• 1 bay leaf
• 1 small red or yellow onion
• 1 garlic clove
• 1 tablespoon bacon fat or vegetable oil
• 1 teaspoon salt
• 1 to 2 sprigs cilantro, optional
On your mark, get set . . .
Cook!
This Vegetables and Side Dishes recipe was published in 'The Cooking Of Brazil (Seconds Edition) by "Matthew Locricchio" - p54 to p55'
Serves 4 to 6
Ingredients:
• 1 pound black, kidney, or white dried beans
• 8 cups water
• 1 bay leaf
• 1 small red or yellow onion
• 1 garlic clove
• 1 tablespoon bacon fat or vegetable oil
• 1 teaspoon salt
• 1 to 2 sprigs cilantro, optional
On your mark, get set . . .
- Pour the beans, a few at a time, onto a clean baking tray or into a wide bowl. Carefully check for anything that is not a bean, such as pebbles, and discard.
- Pour the beans into a colander and rinse thoroughly with cold water. Using your very clean hands, swirl the beans around the colander to remove any dirt.
- Place the beans in a large pot, cover with the water, and let the beans soak for at least 6 hours or overnight.
- If you don’t have enough time to soak the beans or you just want a quicker method, try this: Place the picked-over and washed beans in a large pot. Add the water and bring to a boil for 2 to 3 minutes. Turn the beans off, cover, and let stand for 1 to 1 ½ hours.
Cook!
- Rinse the soaked beans, add them to a large pot, and place them on the stove.
- Cover with enough cold water to come to 2 inches over the top of the beans. Add the bay leaf.
- Bring the beans to a boil over high heat, reduce the heat to low, and simmer for 1 ½ hours, or until the beans are tender.
- As the beans cook use a large spoon to remove any foam or impurities that rise to the surface.
- After 1 hour, remove and taste a few beans to determine their tenderness. They should be just soft without any trace of a hard center.
- Once the beans have cooked, peel and chop the onion into small pieces, measure 4 to 5 tablespoons, and set aside.
- Slightly crush the garlic by laying the fl at side of a chef’s knife on the clove and pressing evenly to break open the skin. Remove the skin, cut off the root end, and chop the garlic. Measure 1 tablespoon and set it aside.
- Place a 10-inch frying pan over medium heat and add the bacon fat or oil. Sauté the onion and garlic until soft. This will take 4 to 5 minutes. If they begin to brown, immediately lower the heat.
- Using a soup ladle or large spoon, transfer about 1 cup of the beans and a little of the liquid they were cooked in to the frying pan.
- Carefully mash the beans, using the back of the ladle or spoon to create a thick paste.
- Add the mashed bean paste to the large pot of simmering beans. Add the salt and the cilantro leaves, and cook over medium-low heat for another 30 minutes.
- As the beans cook, mash them occasionally to help thicken the liquid. Serve hot.
This Vegetables and Side Dishes recipe was published in 'The Cooking Of Brazil (Seconds Edition) by "Matthew Locricchio" - p54 to p55'
Brazilian Rice (Chaval)
Rice is enjoyed every day in Brazil. It can be as simple or as elaborate as the cook makes it, but it is always a part of a Brazilian meal. This recipe involves a few more steps than ordinary boiled rice, but there is nothing every day about the results.
Serves 2 to 4
Ingredients:
• 1 cup long-grain rice
• 1 garlic clove
• 1 ½ tablespoons vegetable oil
• ¾ teaspoon salt
• 1 ½ cups hot water
On your mark, get set . . .
Cook!
This Side Dish recipe was published in 'The Cooking Of Brazil (Seconds Edition) by "Matthew Locricchio" - p51 to p52'
Serves 2 to 4
Ingredients:
• 1 cup long-grain rice
• 1 garlic clove
• 1 ½ tablespoons vegetable oil
• ¾ teaspoon salt
• 1 ½ cups hot water
On your mark, get set . . .
- Place the rice in a fine mesh strainer and rinse with cold water. Skip the next three steps if you are using converted rice.
- Using your very clean hands or a spoon, swirl the rice as it rinses to remove any excess starch.
- Turn off the water and continue to stir the rice a bit more to help it drain. Give the strainer a few shakes to remove any additional water.
- Let the rice continue to drain while you prepare the rest of the recipe.
- Slightly crush the garlic by laying the fl at side of a chef’s knife on the clove and pressing evenly to break open the skin. Remove the skin, cut off the root end, and chop the garlic. Measure ½ tablespoon and set it aside.
Cook!
- In a 9- to 10-inch frying pan heat the oil over medium-high heat for 30 to 40 seconds.
- Once the oil is hot but not smoking, add the drained rice and garlic.
- Sauté for 4 to 5 minutes stirring the rice constantly to prevent it from sticking, or until all the rice has soaked up a bit of the oil and turned slightly darker.
- Add the hot water and salt.
- Return to a boil, lower the heat to simmer, cover the pan, and cook for about 18 minutes.
- Turn off the heat and let the pan rest, without raising the lid, for 5 to 10 minutes before serving. Fluff with a fork and serve.
This Side Dish recipe was published in 'The Cooking Of Brazil (Seconds Edition) by "Matthew Locricchio" - p51 to p52'
Sautéed Greens (Couve à Mineira)
The simplest ingredients can be transformed into the most delectable of dishes in the hands of the Brazilian cook, as this recipe from the state of Minas Gerais demonstrates.
Serves 4
Ingredients:
• 1 pound collard greens, kale, or green or red Swiss chard
• 1 tablespoon bacon fat or vegetable oil
• 1 teaspoon salt (or to taste)
On your mark, get set . . .
• Wash the greens in a sink full of cold water until no grit or sand remains. Remove any dark or discolored spots or shriveled edges.
• Take one leaf at a time and lay it on a cutting board.
Cook!
This Vegetables recipe was published in 'The Cooking Of Brazil (Seconds Edition) by "Matthew Locricchio" - p49 to p50'
Serves 4
Ingredients:
• 1 pound collard greens, kale, or green or red Swiss chard
• 1 tablespoon bacon fat or vegetable oil
• 1 teaspoon salt (or to taste)
On your mark, get set . . .
• Wash the greens in a sink full of cold water until no grit or sand remains. Remove any dark or discolored spots or shriveled edges.
• Take one leaf at a time and lay it on a cutting board.
- Using the tip of a sharp knife, cut the leaves away from the tough stem that runs up the center. Discard the stem.
- Lay the leaves aside, stacked on top of each other, and continue until all the stems have been removed.
- Tightly roll all the leaves together into a long cigar shape.
- Take your time doing this. If the pile is too big, divide it in half.
- After the leaves have been rolled into a tight cigar shape, slice them crosswise into very thin strips, the thinner the better. Be patient, this is a slow process so don’t rush it.
- Once all the leaves have been cut into thin ribbons, gently toss them a few times to loosen them, and then set them aside for the moment.
- If your hand gets tired, it is all right to let the leaves unroll and take a rest. Just reroll them when you are ready to continue.
Cook!
- Heat the bacon fat or oil in a 10-inch frying pan over mediumhigh heat for 30 to 40 seconds.
- Once the oil is hot but not smoking, add the greens and sprinkle them with the salt.
- Sauté quickly until the greens have absorbed some of the oil and have turned a bright green.
- Continue to sauté for about 1 to 2 minutes and then remove the greens to a bowl. Serve hot.
This Vegetables recipe was published in 'The Cooking Of Brazil (Seconds Edition) by "Matthew Locricchio" - p49 to p50'
7/13/2012
California Country Roads Fondue Goes Gourmet
Producers of some of our favorite artisan cheeses, Cowgirl Creamery and Bellwether Farms are country neighbors just a half hour’s drive apart on winding Northern California back roads. In this fondue, the full-flavored, washed-rind Red Hawk from Cowgirl Creamery is nicely balanced by Bellwether Farms’s buttery, smooth Carmody. A splash of sweet wine complements both cheeses.
Ingredients:
• 1 (12-ounce) round Cowgirl Creamery Red Hawk, rind discarded, cubed
• 8 ounces Bellwether Farms Carmody, grated
• 2 tablespoons all-purpose flour
• 1 cup Napa or Sonoma sauvignon blanc
• 2 tablespoons muscat or other sweet dessert wine
Preparation:
Toss the cheeses with the flour in a bowl and set aside. In a fondue pot, bring the sauvignon blanc to a boil over medium-high heat. Decrease the heat to low and add the cheese mixture, ½ cup at a time, stirring until melted after each addition. Add the muscat and stir until smooth. Serve immediately.
Makes 2 cups
SERVE WITH: toasted walnut or other rustic bread cubes • pear chunks • apple chunks • fresh figs, quartered • fig bars • Graham crackers
BEVERAGE SUGGESTIONS: pinot noir • blanc de noirs (sparkling wine) • fino sherry
CHEESE NOTES: Red Hawk is a triple-crème cheese washed with a brine solution that promotes the growth of beautiful red-orange bacteria on the rind. It’s made with organic milk from Marin County’s Straus Family Creamery, located right up the road from the Cowgirl Creamery dairy in Point Reyes Station. If you are not able to find Red Hawk, substitute Italian Taleggio or Robiola, or the French Époisses. Made with rich milk from Jersey cows, Bellwether’s Carmody is an Italian-style cheese with a golden rind and a buttery texture that is balanced by a slightly tangy flavor—perfect for a grilled cheese sandwich.
This recipe was published in 'Fondue by Lenny Rice and Brigid Callinan'.
Champagne Velvet Fondue Goes Gourmet
A fun little four-pack of Rubicon Estates Sofia Blanc de Blancs inspired Lenny to create this velvety fondue indulgence. The base is Taleggio, one of her favorite Italian cheeses. Taleggio is available at varying stages of ripeness, and we recommend a younger, firmer one for this recipe. It will be easiest to remove the rind and cut up the Taleggio while it is very cold.
Ingredients:
• 20 ounces Taleggio, rind discarded and cubed
• 2 tablespoons all-purpose flour
• 1 cup blanc de blancs (sparkling wine)
Preparation:
Toss the cheese with the flour in a bowl and set aside. In a fondue pot, bring the wine to a boil over medium-high heat. Decrease the heat to low and add the cheese mixture, ½ cup at a time, stirring until melted after each addition. Serve immediately.
Makes 3 cups
SERVE WITH: toasted baguette cubes • grapes • apple chunks • pear chunks • fresh figs, quartered • spears of Belgian endive • roasted onion quarters • chopped toasted walnuts
BEVERAGE SUGGESTIONS: off-dry gewürztraminer or riesling • prosecco • blanc de blancs (sparkling wine)
CHEESE NOTES: From Italy’s Lombardy region, Taleggio is a rich, semi-soft cheese with a thin rind of orange mold. Though it has a pungent aroma, its flavor is sweet and mild, with a hint of yeastiness. It gets runnier and more flavorful as it ages. Excellent with fruit, Taleggio is also traditionally served with bitter salad greens like radicchio.
This recipe was published in 'Fondue by Lenny Rice and Brigid Callinan'.
The Luck of the Dutch Savory Classics
Lucky you if you’ve had the chance to visit Ireland’s beautiful County Cork, where dairy cows graze on rolling green hills in the shadow of Blarney Castle. From Northwest Cork comes Coolea, an Irish version of Holland’s Gouda. We pair Coolea here with another Dutch classic, Heineken beer. Bringing nations together, that’s what fondue is all about!
Ingredients:
• 1 pound Coolea, Gouda, or Edam cheese, grated
• 2 tablespoons all-purpose flour
• 1 cup beer (Heineken or other pale lager)
Preparation:
Toss the cheese with the flour in a bowl and set aside. In a fondue pot, bring the beer to a boil over medium-high heat. Decrease the heat to medium-low and add the cheese mixture, ½ cup at a time, stirring until melted after each addition. Serve immediately.
Makes 2 cups
SERVE WITH: Irish brown soda bread cubes • toasted wheat or walnut bread cubes • apple chunks • boiled red or Yukon gold potatoes • roasted or boiled onions • cooked Irish sausages or bacon, cut into bite-size pieces
BEVERAGE SUGGESTIONS: brown ale • Amontillado sherry • blanc de noirs (sparkling wine)
CHEESE NOTES: The Willems family swapped a hectic life in the Amsterdam restaurant business for a farm in the remote countryside of Northwestern County Cork, Ireland. Today they produce Coolea, a Dutch Gouda-style cheese named after the tiny Irish village they now call home. Though it is very much like traditional Dutch Gouda, Coolea has a creamier texture and a nuttier, more caramel-like flavor. It makes a fantastic fondue.
This recipe was published in 'Fondue by Lenny Rice and Brigid Callinan'.
Ye Olde English Pub Special Savory Classics
There is no better place on earth to drink beer than a dark, cozy British pub. Some tasty pub grub washed down with a sturdy ale is the ideal antidote to the damp English winter. This fondue is a salute to the crowning achievements of English cuisine: beer and cheese.
Ingredients:
• 1 pound red Cheshire or sharp Cheddar, grated
• 2 tablespoons all-purpose flour
• 1 cup English or Scottish ale
• 1 teaspoon kosher salt
Preparation:
Toss the cheese with the flour in a bowl and set aside. In a fondue pot, add the ale and salt and bring to a boil over medium-high heat. Decrease the heat to medium-low and add the cheese mixture, ½ cup at a time, stirring until melted after each addition. Serve immediately.
Makes 2½ cups
SERVE WITH: Irish soda bread cubes • toasted whole grain and rustic bread cubes • assorted crackers • apple chunks • pear chunks • cooked British bangers (sausages), cut into bite-size chunks • boiled red or Yukon gold potatoes
BEVERAGE SUGGESTIONS: ale or stout • sauvignon blanc • tawny port
CHEESE NOTES: Cheshire is a Cheddar-style English cheese whose sharp, savory flavor comes from the abundant salt deposits in the areas where the cattle graze. The addition of annatto, a natural coloring for cheese derived from the seeds of the achiote tree, gives red Cheshire its rich hue. This cheese makes a beautiful, deep reddish-orange fondue.
This recipe was published in 'Fondue by Lenny Rice and Brigid Callinan'.
Nordic Nights Savory Classics
Maybe it’s because the Scandinavian land-scape seems like the perfect backdrop for a fondue party, chic or rustic. Maybe it was the influence of chef Marcus Samuelsson and food writer Andreas Viestad, two dreamy Scandinavians with whom we had the good fortune to work. Either way, a fondue celebration of the land of fjords and Vikings is in order. Scandinavians say that their traditional liquor, aquavit (from the Latin aqua vitae, water of life), will magically make room in your stomach for more delicious food; so in case your guests crave another dip of this fondue, be sure to have the bottle of aquavit at the ready.
Ingredients:
• 1 pound Jarlsberg, grated
• 2 tablespoons all-purpose flour
• 1 cup unoaked or lightly oaked chardonnay
• 5 juniper berries
• ½ teaspoon caraway seed
• ½ teaspoon kosher salt
• 2 tablespoons aquavit
Preparation:
Toss the cheese with the flour in a bowl and set aside. In a fondue pot, combine the wine, juniper berries, caraway seed, and salt and bring to a simmer over medium-high heat. Decrease the heat to medium-low and let the pot sit for 10 minutes, then remove and discard the juniper berries. Add the cheese mixture to the pot, ½ cup at a time, stirring to melt after each addition. Add the aquavit and stir until smooth. Serve immediately.
Makes 3 cups
SERVE WITH: toasted black, dark rye, or pumpernickel bread cubes • red or Yukon gold potatoes, steamed or roasted • steamed cauliflower florets • roasted beets • apple chunks • pear chunks
BEVERAGE SUGGESTIONS: white Burgundy • pilsner or lager beer • pinot blanc
CHEESE NOTES: A mild Swiss-style cheese originally made in the Norwegian county of the same name, Jarlsberg has a sweet, nutty flavor and large irregular holes. Jarlsberg is widely available in the United States, but if you can’t find it, try Swiss, Comté, or Gruyère.
This recipe was published in 'Fondue by Lenny Rice and Brigid Callinan'.
7/12/2012
Free Form Mini Rhubarb and Raspberry Galettes
Rhubarb paired with raspberries may not be as common a pie filling as rhubarb and strawberries, but the combination is just as delicious (or even more so, depending on who you ask). Here, the two are simply tossed with cornstarch and sugar, then centered on small rounds of pâte brisée to create individual galettes.
MAKES 8
Ingredients:
• Pâte Brisée (do not divide into 2 disks)
• All-purpose flour, for dusting
• 1½ pounds trimmed rhubarb, cut into ¼-inch pieces (about 5 cups)
• 8 ounces (about 1½ cups) fresh raspberries
• ¼ cup cornstarch
• 2 cups granulated sugar
• Coarse sanding sugar, for sprinkling
Preparation:
1. Divide dough evenly into 8 pieces. On a lightly floured surface, roll out each piece to a 7-inch round, ⅛ inch thick. Transfer rounds to 2 large parchment-lined rimmed baking sheets, arranging several inches apart. (If rounds become too soft to handle, refrigerate until firm, about 20 minutes.)
2. In a large bowl, toss to combine rhubarb, raspberries, cornstarch, and granulated sugar.
3. Cover each round of dough with a heaping ½ cup rhubarb mixture, leaving a 1-inch border. Fold edges over rhubarb filling, leaving an opening in center; gently brush water between folds, and press gently so that folds adhere. Refrigerate or freeze until firm, about 30 minutes.
4. Preheat oven to 400°F. Brush edges of dough with water, and sprinkle with sanding sugar. Bake until crusts are golden brown, about 30 minutes. Reduce heat to 375°F, and bake until juices bubble and start to run out from center of each galette, 15 minutes more. Transfer to a wire rack, and let cool completely before serving.
This Classic recipe was published in 'Martha Stewart's New Pies and Tarts: 150 Recipes for Old-Fashioned and Modern Favorites by Martha Stewart Living Magazine'.
Free Form Thin Pear Tart
Here’s a great weeknight dessert option—no rolling pin required. The cream cheese dough comes together quite easily, and is simply patted into a thin round. A single pear is thinly sliced, then tossed in a bowl with pear brandy, sugar, and lemon juice. The mixture is then fanned out over the dough before baking. Whipped cream makes a nice accompaniment, as does a snifter of pear brandy, naturally.
SERVES 8
Ingredients:
• 2 ounces cream cheese
• 4 tablespoons unsalted butter, room temperature
• ½ cup all-purpose flour, plus more for dusting
• ½ cup plus 1 tablespoon plus 1½ teaspoons sugar
• ⅛ teaspoon salt
• 2 tablespoons fresh lemon juice
• 2 tablespoons pear brandy (or regular brandy)
• 1 ripe, firm Bosc or Red Bartlett pear
• ⅛ teaspoon ground cinnamon
Preparation:
1. Preheat oven to 400°F. Combine cream cheese and butter in a food processor. Add the flour, ¼ cup sugar, and the salt, and process until combined. (Dough will be sticky.) On a parchmentlined rimmed baking sheet, with lightly floured fingers, pat dough into an even 8-inch round.
2. In a medium bowl, combine ¼ cup sugar with the lemon juice and brandy. Halve pear lengthwise, and core (leave skin on). Cut each half lengthwise into ¼-inch-thick slices; transfer to lemon-juice mixture; coat well. Drain slices in strainer. Arrange around outer edge of dough, overlapping slightly, then arrange remaining slices in center. Sprinkle tart with remaining 1 tablespoon plus 1½ teaspoons sugar. Dust pears with the cinnamon. Bake until golden, 25 to 30 minutes. Serve warm or at room temperature.
This Classic recipe was published in 'Martha Stewart's New Pies and Tarts: 150 Recipes for Old-Fashioned and Modern Favorites by Martha Stewart Living Magazine'.
Classic Tarte Tatin
Invented by the Tatin sisters, who owned an inn in the Loire Valley, this dessert is popular all over France, especially in Paris. The tart is baked upside down in a pan in which the apples have been sautéed. When inverted, the finished tart boasts a layer of golden, caramelized fruit atop a base of flaky puff pastry. A copper Tatin pan is made specifically for this purpose; its two handles are designed for easy unmolding. However, any ovensafe skillet, such as a cast iron pan, will work. You can also easily substitute pears for the apples. For the ultimate in flavor and texture, make your own puff pastry from scratch;. Otherwise, choose a goodquality, all-butter brand such as Dufour.
MAKES ONE 10-INCH TART
Ingredients:
• All-purpose flour, for dusting
• ¼ recipe Puff Pastry, or 1 box store-bought puff pastry, preferably all-butter, thawed
• 4 tablespoons unsalted butter, room temperature
• ½ cup sugar
• 7 to 9 Golden Delicious apples (3 to 4 pounds), peeled, quartered, and cored
• Crème fraîche, for serving (optional)
Preparation:
1. Preheat oven to 425°F. On a lightly floured surface, roll out and trim dough to a 10½-inch square. Brush off excess flour. Using a plate as a guide, cut out a 10-inch round. Transfer to a parchmentlined baking sheet, and refrigerate until firm, about 30 minutes.
2. Meanwhile, generously coat bottom and sides of a 10-inch Tatin pan or ovenproof skillet with the butter. Sprinkle sugar evenly over bottom. Arrange apple quarters closely together in concentric circles in skillet, with rounded sides down. Place over medium-high heat, and cook, without stirring, until juices are deep golden and bubbling, 18 to 20 minutes.
3. Bake 20 minutes (apples will settle slightly). Remove from oven, and place chilled pastry round over apples. Bake until pastry is dark golden brown, 23 to 28 minutes more.
4. Invert tart onto a rimmed platter or large plate. If any apples stick to skillet, gently remove them with a spatula and place on tart. Serve immediately, with crème fraîche, if desired.
This Classic recipe was published in 'Martha Stewart's New Pies and Tarts: 150 Recipes for Old-Fashioned and Modern Favorites by Martha Stewart Living Magazine'.
Classic Berries and Cream Tartlets
All you need is one formula to produce a nearly infinite variety of French-style fruit tarts. Start with a pâte sucrée crust, add pastry cream, and top with fresh fruit. You can scatter the fruit freehand, or arrange it in a pattern to make a tarte composée (literally, a “composed tart”). Here, summer berries are mixed and matched, but you can also use stone fruits such as cherries or apricots, or fresh figs or grapes. Pâte sucrée is sturdier than pâte brisée, making it a good choice for tarts that are unmolded before serving. Because the filling is not baked in the crust, it is necessary to blind-bake the shells completely. Traditionally, French fruit tarts are glazed with jam for a polished sheen, but this step is optional; a light dusting of confectioners’ sugar or a few tiny flowering herbs look equally lovely. To make a nine-inch tart, use half a recipe of Pâte Sucrée, and add about five minutes to the baking time.
MAKES TWO DOZEN 3-INCH TARTS
Ingredients:
• All-purpose flour, for dusting
• Pâte Sucrée
• Vanilla Pastry Cream
• 4 cups mixed fresh berries, such as blackberries, blueberries, raspberries, red currants, or sliced strawberries
• ½ cup apricot jam (optional)
Preparation:
1. Preheat oven to 375°F. On a lightly floured surface, roll out dough ⅛ inch thick, 1 disk at a time. Cut out twenty-four 4-inch rounds, and fit dough into two dozen 3-inch tart pans. Trim dough flush with rims. Pierce bottoms of shells all over with a fork. Refrigerate or freeze until firm, about 30 minutes.
2. Line tart shells with parchment, and fill with pie weights or dried beans. Bake until edges are golden, about 15 minutes. Remove parchment and weights; continue baking until crusts are golden brown all over, about 10 minutes. Let cool completely on a wire rack.
3. Fill tart shells halfway with pastry cream and top with berries, arranging in concentric circles. If desired, in a small saucepan over low heat, heat apricot jam until loose, then pass through a fine sieve. Gently brush berries with strained jam. Serve immediately or refrigerate up to 2 hours.
This Classic recipe was published in 'Martha Stewart's New Pies and Tarts: 150 Recipes for Old-Fashioned and Modern Favorites by Martha Stewart Living Magazine'.
Classic Lattice-Top Blueberry Pie
No comments:
Posted by
Unknown
Labels:
Classic Recipes,
Egg Yolk,
Heavy Cream,
Lemon Juice,
Pie Recipes
A woven lattice makes a striking top for a fruit pie, especially colorful fruit, such as blueberries; the open weave allows a peek at the filling and lets steam escape as the pie bakes. The process of weaving the top is easy to follow—cut the dough into strips, preferably with a fluted pastry wheel, and arrange them on top of the filling. This pie and many others with juicy berry fillings are thickened with cornstarch, which has stronger thickening properties than flour (a more appropriate choice for less juicy apples or pears). You may want to adjust the amount of thickener if the berries are particularly juicy, or if you prefer a firmer or looser pie filling.
MAKES ONE 9-INCH PIE
Ingredients:
• All-purpose flour, for dusting
• Pâte Brisée
• 2 pounds (about 7 cups) fresh blueberries, picked over and rinsed
• ½ cup granulated sugar
• ¼ cup cornstarch
• ¼ teaspoon ground cinnamon
• 1 tablespoon fresh lemon juice
• 1 large egg yolk, for egg wash
• 1 tablespoon heavy cream, for egg wash
• Fine sanding sugar, for sprinkling
Preparation:
1. Preheat oven to 400°F. On a lightly floured surface, roll out 1 disk of dough to a 13-inch round, about ⅛ inch thick. Fit dough into a 9-inch pie plate.
2. In a large bowl, toss together berries, granulated sugar, cornstarch, cinnamon, and lemon juice until combined. Pour mixture into pie plate, piling in center.
3. On a lightly floured surface, roll out remaining disk of dough as in step 1. To make lattice, cut dough into ten 1-inch-wide strips using a fluted pastry wheel. Lightly brush edge of dough in pie plate with water. Carefully arrange dough strips on top, weaving to form a lattice. Trim dough to a 1-inch overhang. Fold edges under as desired, and crimp with a fork. In a small bowl, whisk together egg yolk and cream for egg wash; brush on top of dough strips and edge of pie shell. Generously sprinkle with sanding sugar. Refrigerate or freeze pie until firm, about 30 minutes.
4. Transfer pie plate to a parchment-lined rimmed baking sheet, and bake until crust begins to brown, about 20 minutes. Reduce heat to 350°F. Continue baking until crust is deep golden brown and juices bubble, 55 minutes more. (If crust browns too quickly, tent pie with foil.) Transfer pie to a wire rack; let cool completely, at least 3 hours, before serving.
This Classic recipe was published in 'Martha Stewart's New Pies and Tarts: 150 Recipes for Old-Fashioned and Modern Favorites by Martha Stewart Living Magazine'.
7/11/2012
Breastfeeding Problems: Your New Baby and You (0-6 Months)
It can be frustrating when little problems and annoyances raise their heads, making it seem that breastfeeding isn’t the easiest option. The good news is that almost all problems can be resolved, and after the first few weeks, you’ll find that you settle into a comfortable, pleasurable routine with your new baby.
Q. I find I simply don’t have enough milk at some points during the day. What do you recommend?
A. It can take some time for your milk to become established, and for “supply and demand” to kick in. Continue to allow your baby to suckle, even if there doesn’t seem to be much milk coming out. This will stimulate your body to produce more milk to meet your baby’s demands. It may take a day or so for the milk supply to adjust to your baby’s needs, and the only way to do this is to continue to try to feed her when she is hungry. Make sure that you are relaxed when you feed her. If you are tired and anxious, it might seem as though there is no milk, or not enough. In reality, however, even if your breasts do not feel full to bursting, there will be plenty there for your baby. Take some time to rest, and even retire to bed with your baby for a day or two, to divert your energy toward making milk. Most new moms can use a break, and once you’ve got your supply reestablished, you’ll probably feel much better. Make sure, too, that you are getting enough to eat. You need plenty of energy to produce milk, and an inadequate diet can most definitely affect your milk supply. Eat three good meals a day, with plenty of healthy snacks in between, such as whole-grain toast, fresh fruit, cheese, seeds, and nuts.
★ Did You Know ...
that it’s perfectly normal for your baby to become distracted while feeding? Even hungry babies can lose interest. Try to find a peaceful place to feed and talk to your baby quietly, so that he concentrates on you rather than what is going on around him. If he starts to come off and on, take him off the breast and try again later. He’ll soon realize that feeding time is not playtime!
Q. My nipples are sore and chapped, and latching on is becoming very painful; what can I do?
A. Breastfeeding in the early days can be quite painful as your nipples adjust to regular feeding. It may be cold comfort, but things do improve over time and the best thing you can do is persevere. Make sure that your baby is latching on properly. Her mouth needs to be open wide, with her tongue down and forward, and your nipple should be aimed at the roof of her mouth. When she is properly latched on, she should be drawing in all of the nipple, and some breast tissue into her mouth. If you’re not sure, ask your midwife, doctor, or breastfeeding counselor to watch you feed. After feeds, express a little of the rich, fatty milk and rub it over your nipple to encourage healing. Between feeds, keep your bra and T-shirt off for short periods, to allow the air to get to your nipples. Try a good emollient cream for sore nipples too.
Q. My baby has started refusing my breast; what could be causing this?
A. First of all, make sure that you’re relaxed and in a quiet spot. If you are feeling fraught or anxious, your baby may respond in kind and become fussy or even reject your breast. Make sure that he’s latched on properly, too (see above), as he can become frustrated if he’s working hard to feed, and isn’t getting much milk. You may find it helps to express a little milk first. Sometimes your milk may flow too quickly, causing your baby to choke and to cry after latching on. If this happens, try using a nipple shield, which slows down the flow. Also, it may be possible that you’re eating something that disagrees with your baby.
★ Teething Babies
If your baby is latched on properly, she shouldn’t be able to gnaw or bite, but if she’s teething she may use your breasts for comfort. Remove her from your breast as soon as she’s finished feeding and try rubbing a cold, wet cloth on her gums, or offer her something else to chew on.
Q. My baby often goes for hours between feeds, and my breasts become uncomfortable. What should I do?
A. Some babies do have an amazing capacity to last for hours between feeds. While it may help to express some milk when your breasts are uncomfortable, you don’t want to build up your supply to the extent that you are siphoning off milk and storing it, as well as feeding your baby, because it won’t solve the problem in the long-term. Try offering your breast a little more often, even if he doesn’t seem to be requesting a feed.
Also, some very young babies have not yet developed the strength to wake up and demand to be fed. Sometimes a premature or ill baby is too small and sleepy to cry, instead focusing on conserving energy for growth and recovery. Waking a baby in this situation to offer the breast is a good idea. If your baby isn’t putting on much weight and seems tired and listless, see your doctor or health professional.
Q. My baby still seems hungry after feeds; how do I know that I am producing enough milk?
A. If your baby is growing and putting on weight normally, has at least six wet diapers a day, as well as regular bowel movements, is alert when she is awake, but also sleeps well, she is getting plenty of milk. Sometimes babies have growth spurts that make them hungrier for short periods of time; these often occur around three weeks, six weeks, three months, and six months. You will need to feed her more frequently during these periods to build up your milk supply to meet the new demands. It normally takes only 24 to 48 hours for this to happen, so don’t panic.
Sometimes babies vomit after feeding, leaving them very hungry. If your baby spits up more than a tablespoon or so of milk after feeds, pay a visit to your doctor to establish the cause.
Around the four or five month mark, your baby may seem to need more and more milk and may appear less satisfied after feeds. This may be a sign that she is almost ready to start some solid foods.
In most cases, however, you simply need to feed your growing baby more often until things settle down.
Q. My baby wakes continually throughout the night for feeds, and I’m becoming exhausted; what can I do?
A. First of all, make sure that he is getting plenty of milk during the day, at regular intervals. Babies who develop the habit of snacking tend to wake more frequently than those who have good feeds every three hours or so, since their bodies have not become adjusted to increasing gaps between feeds. If your baby does wake up at night, get him up, change his diaper, and settle him down for a good, long feed. While it does mean that you will have to wake up properly, it’s worth considering—he’ll go for longer the next time and he’ll soon get used to one good feed. If he wakes again, try to settle him without a feed, and he’ll soon realize that waking and calling for you isn’t going to get him another one.
Q. My baby constantly falls asleep while feeding; should I wake her up?
A. Babies often fall asleep at the breast, because they are comfortable and deeply relaxed. It’s perfectly acceptable to encourage this, but only if they are getting a good feed before they drift off. If your baby is getting only a little milk before she falls asleep, she is likely to wake soon, demanding more—a process that can go on all day and night! It’s best to gently nudge her, and switch positions, to encourage her to keep suckling. Sit her up and talk to her, and when she’s awake again, put her back on the breast. My mother tells me that she used to tickle my feet to keep me awake. Also try to avoid “big feeds” when she is very tired.
Q. I have a real problem with leaking; could I be making too much milk?
A. Leaking seems to be a problem that occurs mainly in the first weeks of breastfeeding. Before your supply has been “matched” to your baby’s needs, you may produce more milk than your baby needs, causing your breasts to leak and even spurt milk. Try feeding your baby before your breasts become too full. Even if he takes only a little, it can help to ease the flow. Over time, your breasts will respond to your baby’s needs, and become less full. If your baby is ill, or if he has slept longer than usual, you may experience very full, painful, leaking breasts. Try expressing a little milk, and put it in the freezer for a later date. Sometimes breasts leak when your let-down reflex suddenly and unexpectedly kicks in. You may hear your baby—or even another baby—cry, which gets things started. Try crossing your arms across your breasts and hold them firmly for a few minutes, to stop the flow, and keep a supply of breast pads on hand.
Q. I don’t enjoy breastfeeding at all and want to give it up, but I feel incredibly guilty. Does it matter that much?
A. Breastfeeding should be a pleasurable experience for both mom and baby, and if you don’t enjoy it, it can become negative for you both. Breastfeeding for even a short time gives your baby the best start in life, and you should feel proud that you have managed to give her that. Sometimes it simply doesn’t work out, and there are a wide range of good formulas on the market that will ensure your baby gets exactly what she needs. Try not to feel guilty—you can make bottle-feeding sessions warm, nurturing, and positive.
Q. I would like to stop breastfeeding, but my baby refuses a bottle. What do you recommend?
A. First of all, experiment with some different bottle teats. Some of the flatter ones are more similar to the nipple, and he may find this less offensive. Start by offering him expressed milk in a bottle, which he’ll find familiar and less distressing. Try dropping one feed at a time, and offering the bottle when you know he’ll be hungry—perhaps first thing in the morning. It can sometimes help to have someone else offer the bottle, because if he’s near to you, and can smell your milk, he may hold out for the real thing. Make sure the bottle-feeding experience is cozy and nurturing. It can be difficult, but persevere, and he’ll get there. If he’s hungry, he’ll eventually give in, and one or two successful bottle feeds will make things much easier in future.
★ Breastfeeding To Sleep
Many babies seek the breast when they are sleepy because it’s comforting and familiar. There is nothing wrong with breastfeeding a baby to sleep. You don’t want her to become dependent on you feeding her to fall asleep, though. Begin the transition to settling her without milk when you’re both ready.
This recipe was published in 'First Meals & More Your Questions Answered With 50 all-new “recipes to the rescue” by Annabel Karmel - p22 to p25'.
7/07/2012
Annabel’s Salmon Stir-fry with Noodles
PREPARATION TIME 10 MINUTES | COOKING TIME ABOUT 10 MINUTES | SERVES 4 ADULTS
It’s good to eat oily fish like salmon when you are breastfeeding since the essential fatty acids are very important for your baby’s brain development. In this quick and easy stir-fry, the vegetables are lightly cooked to preserve their nutrients, and you can vary them to your own likes and dislikes.
Ingredients:
• 14oz fresh egg noodles
• 2 tbsp sunflower or olive oil
• 1 large carrot, cut into matchsticks
• 1 bunch of scallions, cut diagonally into short lengths
• 1 heaping cup tiny broccoli florets
• 1 heaping cup baby corn, each ear cut into quarters
• 1 heaping cup snap peas
• 1lb salmon fillet, skinned and cut into ¾in cubes
Ingredients for Sauce:
• 2 tbsp plum sauce
• 2 tbsp hoisin sauce
• 1⁄4 cup soy sauce
• 1⁄4 cup sake or dry sherry
• 1 tsp sesame oil
Preparation:
1. Cook the noodles in boiling water until tender, 2–3 minutes. Drain and rinse with cold water, then set aside. Mix together all the ingredients for the sauce and set aside.
2. Heat the oil in a wok or frying pan. When it is hot, stir-fry the carrot, scallions, and broccoli for 2 minutes. Add the corn and snap peas to the wok and stir-fry for 3 minutes.
3. Add the salmon and stir-fry until it is cooked through, about 2 minutes. Pour the sauce into the wok and stir in the noodles. Toss gently until everything is coated with sauce and the noodles are hot. Serve in warm bowls.
This recipe was published in 'First Meals & More Your Questions Answered With 50 all-new “recipes to the rescue” by Annabel Karmel - p21'.
Part 2 Dried Products Chinese Ingredients
Chinese dried products, used as either the main ingredient or as a seasoning for more bland ingredients, are regarded as second to none. Abalone, scallops, oysters and shrimp, although delicious fresh, are much richer in taste and more interesting in texture when dried. Bird’s nest, shark’s fin and edible jellyfish actually have no fresh counterpart in Chinese cooking and always have to be reconstituted before cooking.
Bird’s nest
Nests of the swallows of the genus Collocalia, who line their nests with a thick mixture of predigested seaweed, which then dries to a hard, transparent layer.
Pork liver
Duck Liver
Chinese sausages Wind-dried sausages made of pork or pork and duck liver. Both should be cooked before use.
Edible Jellyfish
Edible jellyfish Preserved and dried in salt, the layers must be soaked in frequent changes of water before use.
Shark’s fin
Shark’s fin The cured fin of one of several species of shark. Processed fins (right) are more economical to use.
Abalone
Abalone Firm-fleshed mollusk that is often only available canned. The juice is useful for soups and sauces.
Dried scallops
Dried scallops Deriving their name from the shell’s shape, these mollusks have a deliciously sweet taste.
Dried oyster
Dried oyster Dried and salted, these mollusks add a “smoky” taste to other ingredients.
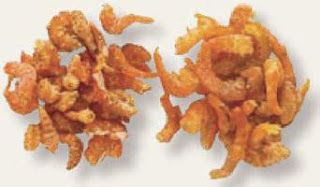
Dried shrimp
Dried shrimp Dried shelled shrimp of various sizes, frequently used as a seasoning and in stuffing.
This Ingredient Information was published in 'Yan-kit’s Chinese Cookbook by "Yan-Kit So (Foreword by Claudia Roden)" - p22'
7/06/2012
Miniature Meat Pies (Pastel de Carne)
For something so small, these tiny pies have achieved star status in the region of Bahia. Baked pastels are served as appetizers or snacks. The fillings vary depending on the region, but one thing is consistent—pastels are outrageously delicious. When preparing this recipe, you can use a food processor to make the pastry. Ask your adult assistant to help with that step. Or the pastry can be made by hand.
Makes about 34 mini pies
Ingredients for The Pastry:
• 3 cups all-purpose flour
• 1 teaspoon salt
• ½ stick very cold unsalted butter (2 ounces)
• 2 eggs
• 3 tablespoons vegetable oil
• ¼ cup ice water
Ingredients for The Filling:
• 1 small yellow onion
• 2 garlic cloves
• 2 tablespoons extra-virgin olive oil
• 1 pound ground beef round or sirloin
• 8 to 10 sprigs flat-leaf parsley
• 1 teaspoon ground cumin
• ½ teaspoon paprika
• ½ teaspoon salt
• 1 cup tomato sauce or tomato salsa
• 5 to 6 drops Tabasco sauce or to taste
• ¼ cup grated Parmesan cheese
• 10 green olives stuffed with pimiento
On your mark . . .
Get set . . .
Cook!
Chef’s Tip: The left over pastry should not be re rolled to make additional pastry cups. It will become too tough from being over worked.
This Appetizers recipe was published in 'The Cooking Of Brazil (Seconds Edition) by "Matthew Locricchio" - p41 till p45'
Makes about 34 mini pies
Ingredients for The Pastry:
• 3 cups all-purpose flour
• 1 teaspoon salt
• ½ stick very cold unsalted butter (2 ounces)
• 2 eggs
• 3 tablespoons vegetable oil
• ¼ cup ice water
Ingredients for The Filling:
• 1 small yellow onion
• 2 garlic cloves
• 2 tablespoons extra-virgin olive oil
• 1 pound ground beef round or sirloin
• 8 to 10 sprigs flat-leaf parsley
• 1 teaspoon ground cumin
• ½ teaspoon paprika
• ½ teaspoon salt
• 1 cup tomato sauce or tomato salsa
• 5 to 6 drops Tabasco sauce or to taste
• ¼ cup grated Parmesan cheese
• 10 green olives stuffed with pimiento
On your mark . . .
- To make the pastry in a food processor, follow the manufacturer’s instructions for making pie crust but use the ingredients listed above.
- Dust the ball of dough with a little flour, cover it in plastic wrap, and refrigerate for 1 hour or overnight.
- To make the pastry by hand, place the flour and salt together in a large bowl, and whisk to blend them together.
- Carefully cut the cold butter into small chunks and add to the flour in the bowl.
- Using a pastry cutter, or the tips of your very clean fingers, combine the butter and flour together into a coarse, crumbly mixture.
- Work quickly to keep the butter cold. Don’t worry if the butter is not fully combined with the fl our, it should be the size of small peas.
- Add the egg and vegetable oil and, using the pastry cutter or a fork, combine the ingredients. Add a little of the ice water and mix well.
- Slowly add the remaining water and continue to mix until you can press the dough into a ball.
- Place the dough onto a lightly floured countertop and knead it a few times. Be careful not to overwork the dough.
- Dust the ball of dough with a little flour, seal it in a plastic bag, or wrap it and refrigerate it for 1 hour or overnight.
Get set . . .
- To make the filling, peel the onion, chop it into small pieces, measure ¾ to 1 cup, and set aside.
- Slightly crush the garlic by laying the fl at side of a chef’s knife on the clove and pressing evenly to break open the skin. Remove the skin, cut off the root end, and chop the garlic. Measure 1 tablespoon and set it aside.
- Wash the parsley to remove any dirt, shake off the excess water, and then roll it in a paper towel to blot any remaining moisture. Remove the stems, finely chop the leaves, measure ¼ cup, and set aside.
Cook!
- Heat the oil in a 10-inch frying pan over medium heat for 30 to 40 seconds.
- When the oil is hot but not smoking, add the onions and garlic, and sauté for 2 to 3 minutes.
- Add the ground beef, chopped parsley, cumin, paprika, salt, pepper, tomato sauce, and Tabasco, if using it.
- Break the meat up with a metal spoon as you mix the ingredients together. This is a slow process so be patient.
- Reduce the heat to low and cook for 10 minutes. Stir occasionally to keep the beef from sticking, and maintain enough heat to keep the liquid at a simmer as it cooks.
- Once the meat has cooked and most of the liquid has reduced, pour the fi lling into a heatproof bowl.
- Put the olives into a hand strainer or colander and rinse with cold water. Chop the olives and add them to the fi lling along with the grated cheese.
- Let the fi lling cool while you roll out the pastry.
- Preheat the oven to 400°F.
- Lightly grease a mini-muffi n tin (24 1 ¾ x 1-inch muffi n cups) with butter.
- To do this, tear off a square piece of wax paper and spread a little butter on. Rub the inside of each muffin cup with the buttered wax paper.
- Remove the pastry from the refrigerator.
- Lightly fl our a rolling pin and sprinkle a little fl our on a clean counter top.
- Cut the pastry into three sections. Cover and refrigerate two sections of the pastry while you roll out the first.
- Roll the pastry out with the rolling pin, flipping it over occasionally, until it is about 1⁄8 inch thick.
- Continue to lightly dust the rolling pin with small amounts of flour, but only if the pastry is sticking.
- Using a 3-inch round cookie cutter or a clean, empty soup can from which you have removed the lid on one end, cut the pastry into circles. To do this press the cutter into the pastry, but don’t twist it.
- Keep the circles right next to each other as indicated by the illustration.
- Pull up one circle of the cut dough, and lay it into the muffin tin. Gently push it down into the cup.
- Repeat until all the circles are cut, and the cups are filled.
- Add a teaspoon of the fi lling into the pastry cup.
- Gently press the top edge of the pastry around the filling being careful not to seal it.
- Repeat until all the pastry cups are filled.
- Set the tin on the middle rack of the preheated oven and bake for 25 minutes or until golden brown.
- Remove the pies from the oven and let cool for 5 to 10 minutes, and then lift them out of the tin and let them cool on a rack.
- Serve warm or at room temperature.
Chef’s Tip: The left over pastry should not be re rolled to make additional pastry cups. It will become too tough from being over worked.
This Appetizers recipe was published in 'The Cooking Of Brazil (Seconds Edition) by "Matthew Locricchio" - p41 till p45'
Cheese Rolls (Pão de Queijo)
No comments:
Posted by
Unknown
Labels:
Appetizers Recipes,
Brazilian Recipes,
Butter,
Canola Oil,
Cheese Rolls,
Eggs,
milk,
Salt
These delicate rolls are originally from Minas Gerais but have become so popular that they can now be found across the country. But be forewarned, pão de queijo disappear almost as soon as they come out of the oven. Once you have your first taste, you will see why these rolls rarely have the chance to get cold.
Makes 40 to 45 rolls
Ingredients:
• 4 cups manioc starch or tapioca flour or starch
• 1 teaspoon salt
• 4 ounces Parmesan cheese (1 ⅓ cups)
• 1 cup plus 3 tablespoons whole milk
• 2 tablespoons butter
• 3 large eggs
• 1 tablespoon canola oil, for forming the rolls
On your mark, get set . . .
• Add the tapioca fl our and salt to a large bowl.
• Blend together with a whisk.
• Grate the cheese using the largest holes on a box grater. Measure 1 cup and set aside.
• Measure the rest of the ingredients and have them close by.
• You will need an ungreased cookie sheet to bake the rolls.
Cook!
- Preheat the oven to 425°F.
- Pour 1 cup of the milk into a saucepan and add the butter. Bring to a boil over medium-high heat. Be careful the milk does not boil over.
- Pour the milk-and-butter combination over the fl our. Mix together with a fork or spoon. Let the mixture cool a bit.
- Add the eggs, one at a time, mixing each into the dough before adding the next.
- Add the fi nal 3 tablespoons of milk to the dough, a spoonful at a time, until the dough is smooth. If the dough feels dry, add a little more milk, but no more than 1 tablespoon.
- Knead the dough in the bowl until all the ingredients are well blended and the dough is smooth.
- Add the grated cheese and mix it into the dough. Don’t worry if the cheese doesn’t blend in completely.
- Lightly grease the palms of your very clean hands with some of the oil.
- Tear off a piece of the dough about the size of a ping-pong ball.
- Lightly roll the dough into a ball in the palms of your hands.
- Place it on the baking sheet.
- Repeat until all the rolls are formed and placed on the baking sheet, leaving ¼ inch between each roll.
- If you need to bake the dough in two batches, refrigerate the unformed dough while the first batch bakes, or use two baking sheets.
- Bake the rolls on the middle rack of the preheated oven for 10 minutes. Set a timer so you don’t forget.
- Reduce the heat to 375°F and bake an additional 10 to 15 minutes, or until the rolls are a light golden brown.
- Remove the rolls from the oven and lift them with a pair of tongs or a spatula to a cooling rack. Serve warm.
Chef’s Tip
Manioc , cassava , or tapioca flour or starch are the same ingredient just identified with different names . Tapioca starch or flour is available in health food stores. You are most likely to find it with the wheat-free or gluten - free products.
This Salads and Appetizers recipe was published in 'The Cooking Of Brazil (Seconds Edition) by "Matthew Locricchio" - p39 and p40'
Chocolate Crispies with Peanut Butter
Preparation time 20 minutes
MAKES ABOUT 18
Ingredients:
• 4 digestive biscuits
• 25g (1oz) butter
• 1 level tbsp crunchy peanut butter
• 1½ level tbsp cocoa power
• 50g (2oz) icing sugar
• 2tbsp golden syrup
• 50g (2oz) butter
• 50g (2oz) puffed rice cereal
Preparation:
1. Place 16 paper cases in bun tins to give support. Put the digestive biscuits inside a plastic bag and crush finely with a rolling pin.
2. Soften the butter, beat in the peanut butter, then stir in the crushed digestives. Refrigerate the mixture for 30 minutes.
3. Roll the peanut butter mixture into small balls and [lace one in each paper case.
4. Put the cocoa power, icing sugar, golden syrup and butter together in a heavy-based pan. Melt slowly over heat without boiling.
5. Stir the cereal into the cocoa mixture until they are evenly coated. Place large spoonfuls in each paper case, making sure the peanut butter is completely covered. leave to set before serving.
This recipe was published in 'StMichael, LITTLE BOOKS OF DELIGHT, Chocolate Cakes, POLLY TYRER - p62'
Mint and Chocolate Chip Buns
Preparation time 20 minutes plus 5 minutes for decoration
MAKES ABOUT 18
Ingredients:
• 100g (4oz) soft margarine
• 100g (4oz) caster sugar
• 2 eggs, beaten
• 75g (3oz) self-raising flour
• 15g (½oz) cocoa power
• 50g (2oz) plain chocolate, finely chopped
• 2tsp peppermint essence
Ingredients for Decoration:
• 10 chocolate mints crisps
Preparation:
1. Grease 18 bun tins or line them with paper cases. Set the oven to 190°C/375°F/Gas Mark 5.
2. Beat the margarine and sugar together until light and fluffy.
3. Gradually beat in the eggs, a little at a time.
4. Sift the flour and cocoa power together and gently fold into the mixture. Stir in the chopped chocolate and peppermint essence.
5. Divide the mixture evenly between the bun tins and bake for 15-20 minutes or until the buns feels firm to the fingertips.
6. Just before the buns are ready to come out the oven, cut the mints in half. As soon as the buns are cooked, place half a mint on top of each one. Leave to cool on a wire rack.
This recipe was published in 'StMichael, LITTLE BOOKS OF DELIGHT, Chocolate Cakes, POLLY TYRER - p60'
Black Forest Buns
Preparation time 20 minutes plus 15 minutes for decoration
MAKES ABOUT 18
Ingredients:
• 100g (4oz) soft margarine
• 100g (4oz) caster sugar
• 2 eggs, separated
• 50g (2oz) self-raising flour
• 25g (1oz) cocoa power
• 25g (1oz) ground almonds
Ingredients for Decoration:
• 150ml (¼pt) double cream, whipped
• 1tbsp kirsch
• 1 tin dark morello cherries
• 25g (1oz) plain chocolate, grated
Preparation:
1. Grease 18 bun tins or line them with paper cases. Set the oven to 190°C/375°F/Gas Mark 5.
2. Beat the margarine and sugar together until light and fluffy. beat in the egg yolks one at a time.
3. Sift the flour and cocoa powder together and gently stir into the mixture with the ground almonds.
4. Whisk the egg whites until stiff> Using a large metal spoon, or spatula, stir one spoonful of the egg whites into the mixture, then carefully fold in the remaining whites.
5. Divide the mixture evenly between the bun tins and bake for 15-20 minutes or until the buns feel firm to the fingertips. Cool on a wire rack.
6. To decorate: mix the whipped cream and kirsch together. Drain the cherries and pat very dry with absorbent paper.
7. Place the cream in a piping bag fitted with a large fluted nozzle. Pipe a whirl of cream on top of each bun. Sprinkle a little grated chocolate over each whirl and top with a black cherry.
This recipe was published in 'StMichael, LITTLE BOOKS OF DELIGHT, Chocolate Cakes, POLLY TYRER - p58'
7/05/2012
Classic Apple Pie
No comments:
Posted by
Unknown
Labels:
Apples,
Butter,
Cinnamon,
Classic Recipes,
Egg Yolk,
Heavy Cream,
Lemon Juice,
Nutmeg,
Pie Recipes,
Salt,
Sugar
Apple pie is the best-known example of a fruit pie, and for many, it serves as an introduction to doublecrust pie-making. To begin, you’ll need a big bowlful of tart, firm apples; use a mix of varieties for the best flavor. The apples are tossed with lemon juice, sugar, spices, and flour, the last of which thickens the juices. Keeping the dough cool as you work is crucial; refrigerate it between steps and before baking to promote a flaky crust and help the pie maintain its shape. A few vents in the top crust will allow steam to escape. For shine and sparkle, brush the top with an egg wash and sprinkle with sanding sugar. Flute or crimp the edges as desired, and feel free to embellish the top crust with cutouts made from scraps of dough. Finally, resist the temptation to cut into the pie before it has completely cooled (about 3 hours); otherwise it will not have time to set properly.
MAKES ONE 9-INCH PIE
Ingredients:
• 3 tablespoons all-purpose flour, plus more for dusting Pâte Brisée
• 1 large egg yolk, for egg wash
• 1 tablespoon heavy cream, for egg wash
• 3 pounds assorted apples, such as Macoun, Granny Smith, Cortland, Jonagold, and Empire, peeled, cored, and cut into ¼-inch-thick slices
• 2 tablespoons fresh lemon juice
• ¼ cup granulated sugar
• 1 teaspoon ground cinnamon
• ¼ teaspoon freshly grated nutmeg
• ⅛ teaspoon salt
• 1 tablespoon cold unsalted butter, cut into small pieces
• Coarse sanding sugar, for sprinkling
• Vanilla ice cream, for serving (optional)
Preparation:
1. On a lightly floured surface, roll out 1 disk of dough to a 13-inch round, ⅛ inch thick. Fit into a 9-inch pie plate (do not trim overhang). Refrigerate or freeze until firm, about 30 minutes.
2. Adjust an oven rack to lowest position. Preheat oven to 425°F. Whisk together egg yolk and cream for egg wash.
3. In a large bowl, toss together apples, flour, lemon juice, granulated sugar, cinnamon, nutmeg, and salt until combined; pour mixture into chilled pie shell, piling in center. Dot mixture with butter.
4. Roll out remaining disk of dough as in step 1. Using a sharp paring knife, cut slits in top of dough. Brush rim of bottom crust with egg wash. Center dough on top of pie plate, and trim with kitchen shears, leaving 1-inch overhang. Tuck dough under bottom piece, and crimp edges as desired. Brush pie with egg wash, and sprinkle generously with sanding sugar. Refrigerate or freeze until firm, about 30 minutes.
5. Transfer pie plate to a parchment-lined rimmed baking sheet. Bake on lowest rack until crust begins to turn light brown, about 25 minutes. Reduce heat to 375°F, and bake until crust is golden brown and juices bubble, 60 to 75 minutes more. (The high initial temperature helps the crust set quickly, keeping it from becoming soggy. Reducing the heat allows the apples to cook through without burning the crust; if top crust or edges are browning too quickly, tent pie with foil.) Transfer pie to a wire rack to cool completely. Serve with vanilla ice cream, if desired.
This Classic recipe was published in 'Martha Stewart's New Pies and Tarts: 150 Recipes for Old-Fashioned and Modern Favorites by Martha Stewart Living Magazine'.
Classic Mile-High Lemon Meringue Pie
No comments:
Posted by
Unknown
Labels:
Butter,
Classic Recipes,
Cornstarch,
Egg Yolk,
Lemon Juice,
Pie Recipes,
Salt,
Sugar,
water
Lemon meringue pie is a perfectly balanced dessert marked by swirling peaks of sweet, nearly weightless meringue atop a rich mouth-puckering filling. A few tricks are in order, however, to help prevent common mishaps, such as a soggy crust or runny filling. First, the crust must be fully blindbaked so that it gets crisp and firm. A half-utter, half-shortening crust like the one used here has a pleasantly crumbly, tender texture. (Substitute an all-butter crust, if you prefer.) The stove-top custard filling is thickened with egg yolks and cornstarch. It must come to a full boil and then cook for several minutes in order to activate the cornstarch and thicken properly.
MAKES ONE 9-INCH PIE
Ingredients:
• All-purpose flour, for dusting
• ½ recipe Pâte Brisée, Shortening Variation
• ¼ cup cornstarch
• 1 cup sugar
• 1½ teaspoons finely grated lemon zest plus ½ cup fresh lemon juice (from 4 lemons)
• ¼ teaspoon salt
• 2 cups water
• 4 large egg yolks (reserve whites for meringue)
• 4 tablespoons unsalted butter, room temperature
• Mile-High Meringue Topping
Preparation:
1. On a lightly floured surface, roll out dough to a 13-inch round. Fit into a 9-inch pie plate. Trim dough, leaving a 1-inch overhang. Tuck overhang under, flush with rim, and crimp edges. Pierce bottom of shell all over with a fork. Refrigerate or freeze until firm, about 30 minutes.
2. Preheat oven to 375°F. Line shell with parchment, and fill with pie weights or dried beans. Bake until edges begin to turn golden, 15 to 18 minutes. Remove weights and parchment. Bake until crust is golden brown, 15 to 18 minutes. Let cool completely on a wire rack.
3. Combine the cornstarch, sugar, zest, and salt in a saucepan. Whisk in the water. Cook over medium heat, stirring, until bubbling and thick, about 7 minutes (about 2 minutes after it comes to a boil).
4. In a medium bowl, whisk egg yolks until combined. Pour in cornstarch mixture in a slow, steady stream, whisking until completely incorporated. Return mixture to saucepan. Cook over medium heat, stirring constantly, until it returns to a boil, 1 to 2 minutes. Remove from heat, and stir in lemon juice. Add butter, 1 tablespoon at a time, whisking until each piece melts before adding the next. Let custard cool in saucepan on a wire rack 10 minutes, whisking occasionally.
5. Pour custard into crust. Press plastic wrap directly on surface of custard. Refrigerate until custard filling is chilled and firm, at least 6 hours or up to overnight.
6. Heap meringue on top of filling, making sure it extends to edge and touches crust (to prevent shrinking). Use a kitchen torch to lightly brown meringue peaks. Alternatively, place pie under the broiler for 1 or 2 minutes; watch carefully to ensure meringue doesn’t burn. Serve immediately.
This Classic recipe was published in 'Martha Stewart's New Pies and Tarts: 150 Recipes for Old-Fashioned and Modern Favorites by Martha Stewart Living Magazine'.
Classic Pumpkin Pie
No comments:
Posted by
Unknown
Labels:
Brown Sugar,
Cinnamon,
Classic Recipes,
Cloves,
Cream,
Egg Yolk,
Eggs,
Ginger,
Pie Recipes,
Pumpkin,
Salt,
water
Making a single-crust pie is a natural next step after a free-form galette. Here, the filling—a custard of pumpkin purée, eggs, and evaporated milk—is quickly mixed by hand in one bowl. The pie’s simple construction offers an excellent opportunity to experiment with embellished edges, such as a wreath of autumn leaves (pictured), made with a one-inch leaf cutter, or a wheatlike braid (pictured; you will need one whole recipe pâte brisée for the shell plus the braid). The key to a great pumpkin pie is to partially bake the crust—called blind baking—before adding the filling. The twice-baked crust stays firm and crisp beneath the creamy custard.
MAKES ONE 9-INCH PIE
Ingredients:
• All-purpose flour, for dusting
• ½ recipe Pâte Brisée
• 2 large whole eggs, lightly beaten, plus 1 large egg yolk, for egg wash
• 1 tablespoon water
• 1 cup packed light brown sugar
• 1 tablespoon cornstarch
• ½ teaspoon salt
• 1 teaspoon ground ginger
• 1 teaspoon ground cinnamon
• ⅛ teaspoon ground cloves
• 1½ cups unsweetened pumpkin purée, canned or fresh
• 1½ cups evaporated milk Whipped Cream, for serving (optional;)
Preparation:
1. On a lightly floured surface, roll out 1 disk of dough to a 13-inch round, ⅛ inch thick. Fit into a 9-inch pie plate. Trim excess dough flush with rim (reserve scraps). Pierce bottom of shell all over with a fork. Refrigerate or freeze until firm, about 30 minutes.
2. Meanwhile, on a lightly floured piece of parchment, roll out scraps. Using a 1-inch leaf-shaped cutter, cut out 40 leaves from dough. Transfer cutouts to a parchment-lined rimmed baking sheet. Using a paring knife, etch veins in each leaf. Refrigerate until ready to use.
3. In a small bowl, whisk together egg yolk and the water; lightly brush one side of each leaf with egg wash. Arrange leaves, slightly overlapping, around edge of crust, making sure they do not extend over edge, to prevent them from browning too quickly. Lightly brush bottom of each leaf with egg wash as you work. Refrigerate shell 30 minutes.
4. Preheat oven to 375°F. Line pie shell with parchment; fill with pie weights or dried beans. Bake 20 minutes. Carefully remove weights and parchment, and continue to bake until golden brown, 10 minutes more. Let cool on a wire rack. (Keep oven on.)
5. In a large bowl, whisk together sugar, cornstarch, salt, ginger, cinnamon, cloves, pumpkin, and 2 eggs. Add evaporated milk, and whisk to combine. Pour filling into partially baked crust.
6. Place pie plate on a rimmed baking sheet; bake until edges are set but center is still slightly wobbly, 35 to 40 minutes. Transfer plate to a wire rack to cool completely. Serve with whipped cream, if desired.
This Classic recipe was published in 'Martha Stewart's New Pies and Tarts: 150 Recipes for Old-Fashioned and Modern Favorites by Martha Stewart Living Magazine'.
Subscribe to:
Posts (Atom)
Popular Recipes
-
Ingredients: • 2 cups flour • ¾ cup cocoa • 1 teaspoon baking soda • 1¼ cups butter, softened • 2 cups sugar • 2 eggs • 2 teaspoons v...
-
MAKES 8 LARGE PANCAKES Ingredients: • 1 cup buckwheat flour (not packed) • ½ cup oat flour (not packed) • 2 tablespoons cornmeal • ¼ c...
-
Fruits and vegetables offer a number of health benefits, and increased fiber is just one of them. The five-serving-a-day goal has been well ...
-
Photographs copyright © 2005 by Victoria Pearson Italians love to linger over long, multicourse meals, with a different wine for each cou...
-
It’s very European to use potatoes in omelets, tarts, and frittatas—even on pizzas. The key is to use small cubes of potato, as here, or ver...
-
If you prefer to bake with an intense variety of dark chocolate (60% to 70% pure cocoa) instead of a milk chocolate or semisweet variety, yo...
-
Photographs copyright © 2005 by Victoria Pearson When asparagus is in season in springtime, use it to capture the flavors of the garden w...
-
Wear a pair of latex or neoprene gloves when handling your chocolate-covered treats to avoid transferring fingerprints before they’re served...
-
Serves 4 Ingredients: • 6 and 1/2oz (200g) sticky rice • 16oz (500g) minced pork • 2 spring onions • 1-2 cloves garlic • 3/4in (2cm...
-
Relatively few herbs and spices are used to produce the sophisticated simplicity of Chinese cuisine. The three indispensable ones are ginger...